Archive for 2009
 Video: 2012 and Lecture: The Moon
Did you miss my little chat plus Q&A on 2012? Lucky you – KCTS recorded it and you can watch it here!
P.S. Don’t miss the lecture at the Pacific Science Center tomorrow (Thursday) night by Andrew Chaikin.
![]()
~ A l i c e !
2012
Update as of 11/2012: I am available to speak to your group on this topic in the greater Seattle area. E-mail me if you’re interested: alicesastroinfo [at] gmail [dot] com.
The 2012 Hoax – The Kitchen Sink
What do the non-existant planet Nibiru, the rollover of the Maya Long Count, a long-expected and non-conjunction of planets, some sunspots, and a lack of reversal in the Earth’s magnetic field, and the continued alignment of the Earth, Sun, and galactic center have in common? They all got picked up and sensationalized as part of a 2012 apocalypse story. This “hoax” rolls pretty much every apocalypse story into one.
Actions – (or “how to talk to your friends about 2012”)
- Validate – Your friends are intelligent people: treat them as such. Validate their interest in the topic and any correct facts first.
- Quash – This “hoax” is causing too much panic, so you need to quash it as soon as possible, without being mean. Share facts from reliable sources and avoid getting stuck in arguments that go nowhere.
- Suggest – Find some common ground. Suggest something real and related that you can enjoy together.
The Maya Calendar* “End” = FALSE
The 13th Maya baktun does roll over on December 21, 2012 – this is often referred to as “the end of the Maya Long Count.” As with many cultures’ calendars, the Maya calendar uses different periods of time than the calendar stuck to your fridge right now. They use 5 numbers to represent a given date, called the Long Count. A baktun = 20 katun, a katun = 20 tun, 1 tun = 18 uinal, 1 uinal = 1 kin (which is one day). Americans usually use only three numbers: year, month, and day. Both cultures have designations for larger periods of time also, we just don’t track them as closely. For instance the Maya have a calabtun which is over 3 million years, and we have millenniums – 1000 years each. Just like your car odometer, when one of the dials reaches “9” the next numeral to show up in its place is “0”, when the baktun counter of the Long Count reaches “12” it rolls over to “0.”

Picture: Kyle May
It is just like flipping a calendar, or when the odometer on your beater car finally rolls so high that it reads 000000. We were all very excited when we got to turn over all the numbers in our calendar on New Year’s 2000 – so I’d be just as excited about 12/21/2012 if I used the Maya calendar in my daily life.
Nibiru = FALSE
Nibiru is the name given to a non-existent planet supposedly discovered by the ancient Sumerians (2200 B.C.E. and 1600 B.C.E.). This was entirely made up by Zecharia Sitchin in several fictional novels that he has written since 1970 about ancient Mesopotamian culture. Nancy Lieder, a “psychic,” built upon these stories, saying the Earth was in danger from Nibiru in May 2003. Nothing happened in May 2003 so the “end” of the Mayan calendar was rolled into the hoax, giving the date December 21, 2012 as the “real” date of the disaster.
Polar Shift = FALSE
In the geologic record there is strong evidence that the Earth’s geomagnetic field reverses polarity every several hundred thousand years with no regularity. There is nothing to suggest this poses a threat to life on Earth, and scientists can’t predict when the next one will happen even to the nearest 100,000 years, let alone to the nearest decade.
“Polar Shift” refers to something different though – it refers to a physical change in the tilt of the Earth. This may have happened to Uranus in the past, and generally requires being slammed into by something very massive. There is nothing that massive on a collision course with Earth within your lifetime.
Planetary Alignment = FALSE
The planets will not be aligned on 12/12/2012. Here are their positions:
12/2012 Planetary Positions
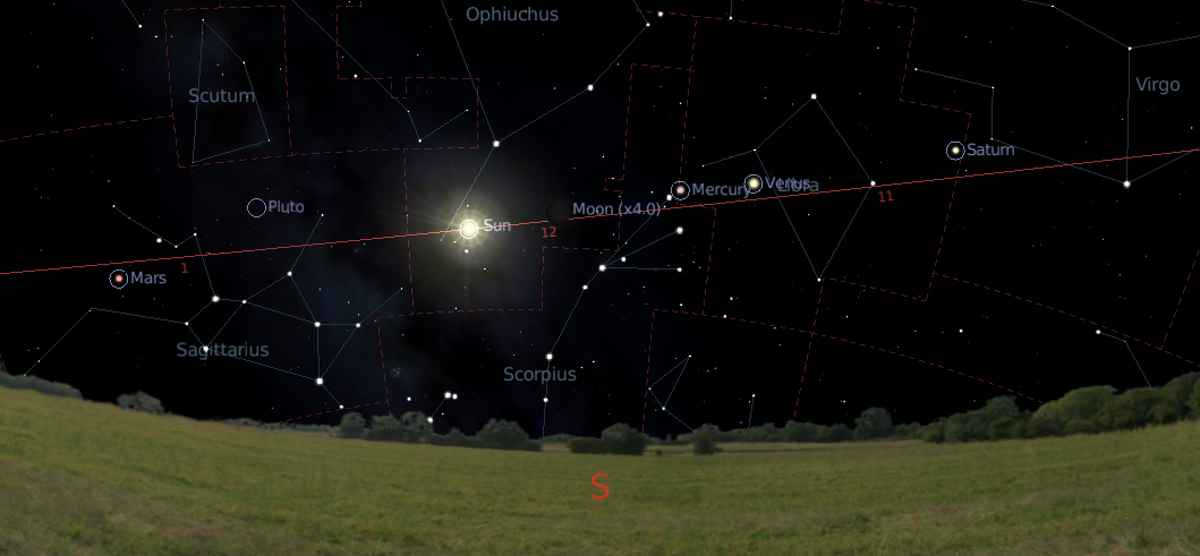
Noon 12/2012
If you look at this other view of the same picture, they look aligned, but bear in mind that line is the ecliptic – the line through the plane of our solar system. All planets are always “aligned” along this line: every moment of every day of every year. That is the definition of the ecliptic.
Solar Maximum = TRUEISH
The solar activity cycle lasts about 11 years, and the last maximum of activity was in 2001, which would imply a maximum in 2012. It’s pretty neat, get a trained astronomer to help you carefully observe sunspots (always use approved filters to observe the Sun, never look directly at it!). The minimum of activity we’re in right now is a little odd, so some solar scientists are predicting the max won’t actually occur until 2013. The most major flares don’t tend to happen until just after the maximum though.
Galactic Alignment = TRUEISH
The Sun, the Earth and the plane of the galaxy will be aligned on December 21, 2012. Of course, they’re aligned around about every winter solstice – it depends how you define the plane of the galaxy. You see the galaxy has thickness, and we’re in the middle of that thickness, and will be for several million more years. Seems aligned to me.
Resources
Astronomical Society of the Pacific
Universe Today
Sky and Telescope 1
Sky and Telescope 2
Sky and Telescope 3
NASA
Related Alice’s Astro Info
Maya Calendar
Fallacies
Maya Long Count Cheat Sheet
1 kin = = 1 day
1 uinal = 20 kin = 20 days
1 tun = 18 uinal = 360 days
1 katun = 20 tun = 7200 days (about 20 years)
1 baktun = 20 katun = 144000 days (about 400 years)
1 may = 13 katun = 1872000 days (about 5000 years)
1 may = 13 katun = 93600 days (about 255 years)
20 may = 13 baktun = 260 katun = 1872000 days (about 5000 years)
13 baktun (or 20 may) is when the Long Count rolls over
1 pictun = 20 baktun = 2880000 days (about 8000 years)
1 calabtun = 20 pictun = 57600000 days (about 150000 years)
1 kinchiltun = 20 calabtun = 1152000000 days (about 3 million years)
1 alautun = 20 kinchiltuns = 23 040 000 000 days (about 63 million years)(Full disclosure: I recalculated the numbers in red and changed what is written in the source material, because the math was off due to a typo.)
![]()
~ A l i c e !


Talk Coming Up! 2012: the Movie, the Astronomy, and the Hoax!
Hey all!
Pacific Science Center’s Science Cafe team just asked me to host a talk/Q&A at the next Science Cafe: TUESDAY, November 3! I’m going tackle “how to talk to your friends about 2012.”
Join us next Tuesday, November 3 for a myth busting Queen Anne Science Café. As we approach 2012, TV shows, new books – even a new movie – all sensationalize the idea of the world “ending” in 2012. Our next Science Café, 2012: The Movie, the Astronomy, and the Hoax, will debunk any fears you may have about the end of the world. Don’t miss a fascinating evening of science, drinks and hoaxes, 7:30 p.m. at T.S. McHugh’s.
Don’t worry though – it is an all-ages event, so bring whomever you’d like. The talk will be Cafe-style: shortish followed by plenty of question and discussion time. See you there!

![]()
~ A l i c e !
Carnival of Space #124
We are All in the Gutter, Looking at the Stars is hosting this week’s Carnival – which is about a lot of different things, since all the Mercury and Moon kerfuffle happened last week.
![]()
~ A l i c e !
Alice’s AstroInfo Videocast and TV Interview
Answering some common questions about buying a first telescope.
Q13 FOX interviewed me for about 10 seconds last night about the LCROSS Mission. Have fun!
![]()
~ A l i c e !
LCROSS Impact
There are two important Moon stories that have happened or are happening in the current couple weeks. They range from exciting (confirmation of the discovery of water on the Moon) to super-exciting (we’re going to slam a spaceship into the Moon on Friday).
Story 1: The Near Future – LCROSS
On Friday October 9, 2009 (4:30am PST) NASA’s LCROSS spacecraft will separate into two parts (the “Centaur” followed by the “shepherding” observing spacecraft) and both will slam into a crater on the Moon, kicking up a plume of material big enough to be seen from Earth with 10- 12-inch telescopes. NASA has requested that astronomers (amateur and professional) observe the plume if possible to help out with the science of the mission. This is one of only a few NASA missions I know of to actively seek the participation of amateurs. Awesome.

LCROSS Shepherding spacecraft observing the plume from the LCROSS "Centaur" impact
This video gives a good look at what is going to happen: LCROSS Impact Animation from NASA
We want to see that plume get large enough to be lit by the Sun, which will cause ice (water), hydrocarbons, and carbon-compounds to vaporize and become more detectable.
Some useful statistics from NASA:
- The first spacecraft to impact is “about the weight of a large SUV, and will impact the Moon at over 9,000 km/h (5,600 mph).”
- The crater it makes will be “about 1/3 of a football field wide and about the depth of the deep end of a swimming pool.”
Story 2: The Recent Past – H2O
While we’re on the topic of the Moon – a couple weeks ago we got pretty good confirmation of water on the Moon at the end of September. Three separate spacecraft confirmed this: Chandrayaan-1, Deep Impact, and Cassini. How much water? That depends on a lot, but so you have something to give out: Emily (of the Planetary Society) says, “10 to 1000 parts per million. This is not a lot. The very highest number corresponds to one liter of water in one ton of lunar rock.”
Where’d I Get My Info?
LCROSS
http://lcross.arc.nasa.gov/impact.htm
http://www.nasa.gov/mission_pages/LCROSS/main/index.html
Where to look on Friday morning!
Water on the Moon – Read Emily’s Posts
http://www.planetary.org/blog/article/00002117/ – Part 1
http://www.planetary.org/blog/article/00002118/ – Part 2
![]()
~ A l i c e !
Carnivals #121-123
Carnival of Spaces! Check them out to get your dose of Astronomy.
#121 – Hosted by Next Big Future!
#122 – Hosted by Cumbrian Sky!
#123 – Hosted by Weird Warp! (They even mention this little blog)
![]()
~ A l i c e !
Binocular Mount
When you ask most amateur astronomers (or me) which telescope we recommend for beginners, we will all tell you what you don’t want to hear: don’t buy a telescope first. Buy a pair of binoculars, learn the sky, and then buy a telescope. But that isn’t the answer you wanted, so you go buy a telescope anyway. I understand. I’ve been you. So, if you aren’t going to listen to me: here is my advice on what telescope to buy as a first telescope.
If you are going to listen to me (Hooray!), you may have noticed the gaping flaw in my plan: binoculars are very hard to hold steady, almost impossible in fact. At the end of this article** I’ll tell you the story of the 5-year-old Alice and the shaky binoculars. They do make tripod adapters for binoculars, but they require your binoculars to have certain built-in features. I’d rather you just grabbed the closest pair of binocs and started stargazing. The only truly versatile mount I saw costs at least $50.
I don’t have $50 to spend on something that is supposed to be a quick and cheap introduction to assisted stargazing. I also couldn’t find a guide for building such and item, so my husband and I created one.
Instructions for Building a Binocular-to-Tripod Adapter
I have tried to give the simplest instructions here, aimed at using whatever you have on hand and coming out with a clean finished adapter. You can make this as complicated and fancy as you want, or you can hack it together in fifteen minutes with plywood and glue. Use the skills you have.
Materials
- Binoculars
- Tripod with quick-release plate *
- Small piece of scrap wood (larger than the quick-release plate)
- Medium piece of scrap wood (longer than your binoculars are wide, and narrower than they are deep)
- Two screws (long enough to go through both pieces of wood, thin enough not to split the wood)
- Two fasteners (zip-ties, heavy-duty twist-ties, velcro straps, bendable coat hangers – whatever you have around)
Tools
- Saw (for small cuts on wood and cutting through the screws)
- Wood file (you could also use this to finish your screws instead of the saw)
- Drill
- Pencil (or other way to mark the wood)
Directions
Step 1 – Create a new quick-release plate.
Remove the quick-release plate from your tripod. Cut a piece of the small scrap wood that matches its dimensions as exactly as possible. It is okay if the wood piece is thicker than the quick-release plate, but it cannot be thinner, and the edges must be exactly the same to get a solid lock.

Cut a small piece of scrap wood.

Cut it to the same dimensions as the quick-release plate.
File the angled sides to match the angle of the sides of the quick-release plate. This is where the tripod is going to lock down the plate, so you’ll want to test your angles by inserting the new wooden plate into the tripod head. When it fits neatly and locks firmly into place you’ve done a good enough job.
This is where I had the most trouble. I found that by resting the file flat and holding the wood at the correct angle I was able to file off enough to make my new plate fit.

Hold the wood at the correct angle and drag across the file

File the edges to match the angle of the edges of the quick-release plate
Step 2 – Attach to the support for the binoculars
As you can see, I’ve carefully chosen a block of wood that is not as deep as the binoculars so there is room for my nose, and it is wider than the binoculars so I don’t have to be too finicky about exactly where I attach the binocs when I get to that step.

All the finished pieces - ready to combine
Now attach the new plate to the wood you’ve chosen as a support for your binoculars. It should be centered both ways.
Drill two pilot holes for your screws – you don’t want to split your wood after all that work you put into the new plate. If you put them towards opposite corners you’ll get a nice solid connection, with no chance of slippage or spinning. We also countersank our screws, which you might want to do because it keeps the bottom of your quick-release plate flush with itself.

Position your screws in opposite corners.

Dont forget to keep the wide side of the plate AWAY from the wooden support!
File off the ends of your screws so they don’t poke up and scratch your binoculars.

Filed-off screws
Ta-da! You’re done!

Finished Mount (we are using heavy-duty twist-ties instead of zip ties or velcro)
Oh wait – you want to know how to USE it now?
Step 3 – Using your finished mount
Pull out your binoculars and point them at something far away. Focus them and get them all nicely-adjusted for your eyes. It is important that you do this first, or you may end up fastening your binoculars in a position that is out-of-alignment for your eyes.

Adjust your binoculars
Attach the mount to your tripod, and rest the binoculars on the mount. Loop your fasteners around the middle of the binoculars and underneath the mount. Fasten them securely, but not so tightly as to change the careful adjustments you made to focus and align the binoculars.

Loop the fasteners around the middle of the binocs, and under the bottom of the support
Check – do you feel comfortable tilting the tripod head from side-to-side and up and down with the binocs attached the way they are? If not, you need to fasten them more securely. If so, then take it outside and start looking up!

A finished mount, with binoculars attached!
Notes
*No quick-release plate?
If you have a tripod that does not have a removable quick-release plate, you’ll need to attach a 1/4 by 20 nut in the middle of the support wood instead of creating a wooden quick-release plate. (To get the right size nut, just take your tripod either to your stash of random fasteners or to the hardware store and find one that fits it – though 1/4 by 20 is almost entirely standard). I had a thought about this involving a hexagonal hole exactly the size of the nut and some amazing glue. This to That recommends LePage’s Metal Epoxy. I didn’t go through with this idea, so the execution is left as an exercise to the reader. please let me know if you come up with an easy and functional solution!
**Alice and the Shaky Binoculars
The year was 1986. The month was cold. One night, Mom and Dad bundled 5-year-old Alice and her baby brother, Nils, into the car. Maybe Uncle Ron came too, or maybe he was in a different car. In any case it was clearly a big occasion. Together they drove and drove and drove. The night got darker and darker. Finally, they all pulled over on the side of a steep hill. Alice got out of the car while Mom and Dad got Nils.
Dad got out some binoculars. Mom reminded Alice that we were looking for Halley’s comet. The only thing that really mattered about Halley was that of everyone on the hillside that night, only Alice and Nils would get to see the comet twice.
While Mom turned Nils to face the sky, Dad crouched down to help Alice look through the binoculars. A shiny white object streaked and wobbled through the field of view.
“I see it! I see it!” said Alice, excited.
Once everyone was thoroughly cold, they all got back in the car and drove home – possibly stopping at Shari’s or Denny’s for something warm to drink.
That memory is still with me, which is the most important part of the whole experience. Now I know that wasn’t Halley’s comet I saw in those binoculars, it was a star, or maybe even a streetlight – wobbling past because I couldn’t hold the binoculars still enough. If only we’d had this binocular tripod mount!
At least I know that some of the photons bouncing off Halley’s comet did bounce into my eye, just not enough of them for my brain to register. Oh well, next time. Here I come 2061!
Have fun with your new binocular tripod mount!
![]()
~ A l i c e !
MESSENGER’s 3rd Flyby of Mercury
NASA’s MESSENGER just did its third flyby of Mercury on September 29th, 2009. It will enter orbit in March of 2011. Here are a few discoveries, with some personal notes and thoughts.
Bright Spot

Credit: NASA's MESSENGER
Interestingly, this bright spot has been seen and photographed only three times – twice by MESSENGER, and the first time from the ground. That ground image was by Ron Dantowitz, one of my coworkers from the Museum of Science! He used the Mt. Wilson Observatory to collect an incredible image.
The light parts are probably kicked-up material from the basin in the middle. Due to the shape and color, the basin may or may not be volcanic in nature. They’re still studying.
Double-Ring Crater

Credit: NASA’s MESSENGER
Ahh, beautiful. Double-ring craters are an indication of a high-force impact – usually a very massive meteorite. There is a “ripple effect” in the rock – like dropping a pebble in a pond – except you’re dropping a rock on a planet. Sometimes you even get a “splash-back” which forms a peak in the middle of the crater.
The rock of the surface of the planet is made molten by the force of the impact, and resolidifies – freezing the ripples in place. You don’t want to be nearby when this happens.
Crater Ejecta and Secondary Impact Chains

Credit: NASA’s MESSENGER
How do you get a string of craters in a very straight line? No … stop. Consider for a moment. You know what? I’m not going to tell you to the end of the post in order to FORCE you to think about it.
Paw Print!

Credit: NASA’s MESSENGER
I couldn’t not include it – it is just too cute!
Now – how did this happen?
You know, for all of the great ideas you just had, this set of craters is coincidence (like the smiley-face crater on Mars). Pretty cute though, right?
Crater Ejecta and Secondary Impact Chains – Continued
Okay, I hope you came up with some creative answers. Often they are caused by a “splash” kicked up when a meteorite forms a crater (in this case called a primary crater), and some of the material tossed up is big enough that when it comes back down it makes a secondary crater.
Now, instead of just one rock being kicked up and away from the primary impact, several are. They all fly off in the exact same direction (away) and when they come down each one makes a secondary crater – and they all occur in a line.
![]()
~ A l i c e !